How to Start a Reef Tank?
Starting a reef tank can be easy even for beginners; following the easy quick start reef tank guide and these six quick start steps:
- Purchase tank, stand, and equipment
- Place tank on leveled stand and install equipment
- Place sand and rock
- Add saltwater and nitrifying bacteria
- Add fish
- Add invertebrates and coral
Please read on for a detailed explanation of each step.
Step 1: Purchase tank, stand, and equipment
Here are three complete reef tank setups (a/k/a builds) that are proven to work and are ready to go! These tanks are about 40 gallons, a perfect starter tank for beginners. I list all the equipment you need to purchase to get started in the right direction.
- Budget Reef Tank: As with most reef tank setups, reef lighting is the highest cost. Estimated tank and equipment price: $500.00 – 700.00.
- Affordable Tank with Internal Sump: The next technological step is the all-in-one tank. This affordable all-in-one will cost you between $700.00 – $1,000.00.
- Plug and Play Tank with Internal/External Sump Option: This all-in-one tank has a modular external sump option. The tank is a modern beauty that comes with a matching stand. The estimated tank and equipment price is $1,750.00 – $1,850.00.
We all invest in things that bring us joy, and it shouldn’t surprise you to spend $600 – $1000 the first year – after all, this isn’t a goldfish bowl. This hobby can be as cheap or expensive as you want.
Like owning a dog, a dog is suddenly costly if you buy special food, treats, a dog bed, grooming, veterinary care, preventative medications, and obedience training. It’s all about what works for you.
Budget reef tank build:
This setup benefits from a very low-cost tank and utilizes affordable hang-on equipment. You are still looking at a $500.00-700.00 investment. Here is a list of all you need to get going with links to review or buy online.
Harsh Truth: Corals are what make a saltwater tank a reef tank! If the cost of quality lighting for corals scares you, then maybe you should stick to a saltwater fish tank.
Nano Reef Adviser
- Tank: Tetra 40 or similar
- These tanks are not especially attractive, but at $80.00 or less, they get the job done on a budget. These tanks often go on sale for $1/gallon – so you might be able to time your purchase and save $40.00
- One advantage to starting with a budget glass box is that if you hate the hobby, you haven’t spent a fortune, and if you love the hobby, you can upgrade to a larger tank without regrets!
- Filter: Seachem Tidal 55 HOB Power Filter.
- Dual water intakes pull water from the tank and over the media bags, biological filtration, and filter fabric.
- The filter pushes discharged water back into the tank, promoting water movement.
- Flow regulation allows you to customize your flow to match your tank.
- Heater: Eheim Jager TruTemp 100 Watt Aquarium Heater
- Cold Climate Upgrade: Jager TruTemp 125-Watt Aquarium Heater
- This budget heater is under $25.00, is made of shatter-proof glass, and comes with a safety control that will shut it off when it’s out of the water.
- If you live in a colder climate, extra wattage in your heater will help keep it from overworking.
- Light: Aquatic Life T5 Hybrid 36 Inch Fixture w/ LED Mounting System & Decor Endcaps (Black)
- At $299.99, this T5 fixture provides excellent coral lighting at a lower cost than quality LED fixtures. (You would need 2 LED fixtures for this rectangular tank due to the 36-inch length.)
- This hybrid light has LED mounts, so you can add LED fixtures later to the T5 bulb setup. The flexibility enables you to grow into the hobby – or if you suddenly find yourself with a taste for expensive SPS corals that demand all the light you can give them.
- The high-output T5 bulbs are sold separately at about $20 each.
- Optional Upgrades: A few months later, you can add a powerhead to increase the water flow throughout the aquarium and a protein skimmer to improve filtration.
- Budget Powerhead: Hydor Koralia Nano Circulation Pump/Powerhead 565gph. This powerhead is an excellent starter pump with good flow for about $40.00. It won’t last as long as the $300.00 powerheads like the EcoTech VorTech MP10 – but it’s 1/10th the price.
- Protein Skimmer: AquaMaxx HOB-1.5 Hang-On-Back Protein Skimmer. The AquaMaxx skimmer removes accumulated proteins and organics from the water column. This AquaMaxx skimmer features high-quality Italian-made Sicce pumps.
A few downsides of the budget tank setup are that it has no sump, so all equipment and filtration can be seen hanging on the tank. The tank must sit away from the wall to allow space for the hang-on equipment. Also, if you want to upgrade to a rimless tank with low-iron glass, you will add $150-$250 to the final cost.
If you want to start cheap, you can buy used aquarium equipment. The good news is that it is effortless to find. The bad news is it is often neglected and likely to fail prematurely.
If you buy used equipment, remember that the cleaner it is, the more likely had better care. If it looks like trash in the corner of their garage, it probably is trash, and you should avoid it regardless of the deal.
You can find used aquarium equipment on Facebook Marketplace and Craig’s List or at your local fish store. Your LFS will likely have employees looking to upgrade their tanks. That could be an opportunity to get sound working equipment reasonably priced.
Affordable reef tank with internal sump:
Aquariums with internal sumps are known as ‘all-in-one’ aquariums, or AIO for short. The internal sump holds most of the equipment at the rear of the all-in-one aquarium. This provides a cleaner appearance and allows the tank to sit closer to the wall than with hang-on equipment.
An all-in-one aquarium is my minimum recommendation for a starter tank if you think you are serious about owning a reef tank. The small footprint, clean look, and simplified mechanics make it easy to have a clean-looking, successful reef tank that is easy to maintain.
- Tank: NUVO Fusion 40 Pro – AIO 40 Gallon Aquarium Bundle by Innovative Marine. A bundle is a great way to get into an aquarium because they come close to ready to run with lots of extras. Its a lot of tanks for under $700.00
- My current tank is an AIO by Innovative Marine. I’ve had their SR (shallow reef) 60 going on for five years – so I have no problem recommending Innovative Marine!
- Filter: Included with the bundle is a 528 gal/hr DC return pump, a filter sock, and a media basket with three tiers for various media options. Filter pads, activated carbon, and GFO are included in the bundle for the media basket, and a filter sock holder with a 200-micron filter sock is provided for additional filtration.
- The most fabulous feature of a DC return pump is the adjustability of the flow. You control the pump’s output with the included controller.
- Heater: Cobalt Aquatics Neo-Therm 150 Watt Aquarium Heater w/ LED Display
- The Cobalt Aquatic heaters are known for accuracy. The Neo-Therm is accurate to within +/-0.5 degrees F.
- Temperature stability is a crucial parameter to monitor and maintain. It’s super easy with this heater.
- It has an LED display that simultaneously shows the tank and set temperatures.
- Light: One AI Prime 16HD Light and one AI Prime Tank Mount
- Optional Upgrades: A few months later, you can add a powerhead to increase the water flow throughout the aquarium and a protein skimmer to improve filtration.
- Powerhead: Hydor Koralia Nano Circulation Pump/Powerhead 565gph This powerhead is an excellent starter pump with good flow for about $33.00. It won’t last as long as the $300.00 powerheads like the EcoTech VorTech MP10 – but it’s 1/10th the price.
- Protein Skimmer: Tunze Comline DOC DC Protein Skimmer 9001 Skimmers remove accumulated proteins and organics from the water column. The Tunze features high-quality Italian-made Sicce pumps.
- Auto Top Off (ATO): Tunze Osmolator 3155 ATO Auto Top Off System Tunze is German-designed and has a precision optical sensor to sense your tank’s water level changes. The sensor activates the ATO when the water is low and stops the ATO once the water has returned to the proper level. The float switch provides backup protection from overflowing should the optical sensor fail.
Plug and play all in one reef tank:
This tank setup is all-in-one with a ton of surprises. First, it comes ready to run with more standard equipment than other reef tank bundles. It is also pre-designed and built, ready to convert to an externally plumbed sump if and when you are ready.
- A modular sump system provides the dual option of keeping the tank an AIO or converting it to add an external sump system and piping. Perfect for beginners who are looking to grow into the hobby.
- Extras built-in: A protein skimmer, integrated power center with seven individually switched plugs, and a ventilated cabinet stand.
- And it’s a beauty! The Red Sea E-Series is a rimless tank with ultra-clear glass, beveled edges, and no bracing bar.
The Red Sea company makes some of the most excellent tanks in the industry. They are modern-looking, cleanly appointed, and include many bells and whistles. It is a great way to go if you can afford a starter tank like this.
- Tank: The Red Sea MAX E-Series 170 rimless aquarium is a 45-gallon reef-ready tank.
- Filter: The bundle includes a 620 gal/hr and a media basket with shelves for various media options.
- Power Center: An integrated power center mounted in the cabinet has seven individually switched outlets and one plug. The conveniently located mounting improves safety and easy access with a removable cover.
- Light: Red Sea’s reef-safe ReefLED 90 lighting is included. An arm mount that swings up and out of the way is included when you need to get into the tank for maintenance.
- The ReefBeat app includes preset photo-period and acclimation periods, lunar cycles, simulated random cloud activity, and weekly schedules to store your custom settings.
- Modular Rear Sump: E-Series modular rear sump has two sump options for flexibility, enabling straightforward conversion of the integrated rear sump into a fully operational stand-alone in-cabinet sump.
- External sump conversion: The overflow system, with its flow-regulated silent-flow downpipe, connects to the integrated multiport bulkhead without any cutting, gluing, or emptying of the entire aquarium.
- Heater: A heater is not included. I recommend the Cobalt Aquatics Neo-Therm 200 Watt Aquarium Heater w/ LED Display.
- The Cobalt Aquatic heaters are known for accuracy. The Neo-Therm is accurate to within +/-0.5 degrees F.
- Temperature stability is a crucial parameter to monitor and maintain. It’s super easy with this heater.
- It has an LED display that simultaneously shows the tank and set temperatures.
- Optional Upgrades: A few months later, you can add a powerhead to increase the water flow throughout the aquarium and the external sump system that converts your AIO to an external in-cabinet sump.
- Powerhead: If you can afford this tank, invest in a high-quality powerhead. The EcoTech VorTech MP10 is a great pump that puts out up to 1500 gallons per hour. The MP10 is fully adjustable with several modes, from the lagoon and reef crest to pulse and nutrient transport modes. I have never had a problem using EcoTech powerheads on my current tank. Buy your MP10 here for the best price.
- External Modular Sump System: You can buy the Red Sea external sump conversion kit with the piping and sump as a complete system.
- The external sump system upgrade includes an integrated auto top-off (ATO) unit.
- If you want to buy a different sump for a particular configuration, you can buy just the Red Sea piping system and provide the sump from a third party at your option.
Step 2: Place tank on leveled stand and install equipment
It is critical to have a level tank on sturdy support. The tanks recommended in this article weigh 450-550 pounds, counting the tank, water, rock, and sand. If they are not placed level, irregular stresses on the tank can lead to damage. The damage usually shows at corners where the glass is structurally sealed with silicone sealant.
Buying a stand constructed explicitly for your size fish tank is best. Be extremely careful if you plan to DIY the tank cabinet or if you’re going to use a piece of furniture you already own. You may find your money, hard work, and pets sloshing around on your floor if not placed on a proper stand.
To level an aquarium, you need to level the aquarium’s stand and never the aquarium. The aquarium must be fully bearing (all sides) on the stand, and any shimming of the tank would surely result in damage.
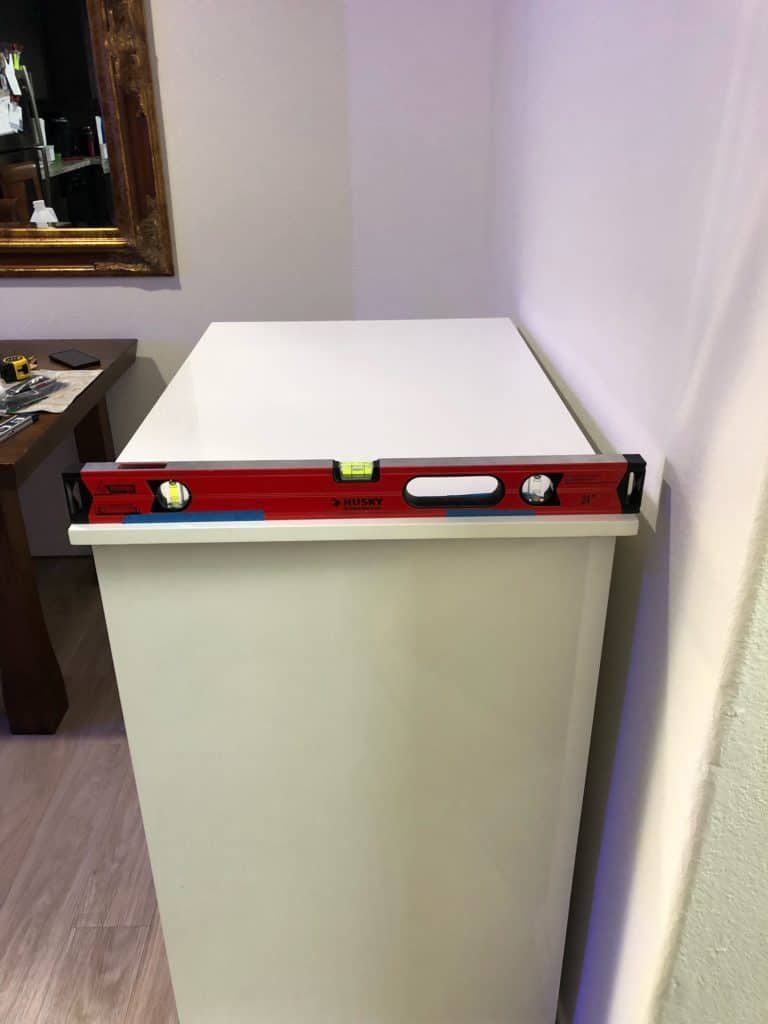

Level the stand by installing tapered shims under the stand’s low side(s), where it bears on the floor. The stand must be level front to back and side to side. Use a carpenter’s level to verify in both directions.
Tap the tapered shims under the cabinet, slowly raising each side required to level the stand. Once level, you can add more shims around the base to support if necessary.
You can use an aquarium mat over the stand before placing the aquarium if preferred. A self-leveling mat is an extra level of care that your tank will sit as level as possible. The mat must be equal to or larger than the tank dimensions.
Do not use a shorter mat than the tank in any direction. Innovative Marine has great aquarium mats offered through MarineDepot.com for various tank sizes.
Step 3: Place sand and rock
Sand and rock not only help a reef tank look beautiful, but they also serve as the most important filter in the tank. Beneficial bacteria populate the rock and sand to break down uneaten food and fish waste. These bacteria are your biological filter!
Sand: Sand is the easiest part of this equation. I recommend live sand from CaribSea to kick-start your new biological filter. Live sand contains a broad spectrum of marine bacteria and compresses new tank cycling time. The sand’s surface area is immense as a beneficial bacteria playground with all the different particles.
I use CaribSea Arag-Alive Special Grade Reef Sand. It is available online, or you can pick it up at your local fish store. This sand is a grain size that is small enough for your creatures that like to burrow but not so small that it blows around in the tank. The video below explores sand colors and granule sizes in more detail.
You should buy 35-45 lbs of sand to get approximately a 1-1/2 inch deep sand bed in the recommended tanks above. The deeper you go beyond an inch will create additional work to keep the sand bed clean.
We don’t recommend a sand bed over 2 inches anywhere in the tank. However, if you want a different sand bed depth or buy a different size tank, you can check out this easy-to-use sand bed calculator here.
Rock: Rock is a different issue. There are many rock choices for your reef tank; sometimes, it just comes down to what you can afford. A few types of reef rock are:
- Pre-cured live rock from a fish store. The fastest path and the most expensive at $8.00 – $10.00 per pound. It is also likely that some pests in this rock you might not want in your aquarium down the road. This rock is the pretty pink coralline algae that reefers love with an established bacteria load that will shorten the tank’s nitrogen cycling.
- Real reef rock. This rock has been cured in saltwater and is shipped damp. It has purple coralline color and is pest free. The price is about $6.00 per pound.
- Dry rock. Less expensive at around $3.00 per pound, this rock is white without any established bacteria. It also is pest-free and free of nuisance algae. A downside is that it will take months for the rock to change from white to purple. You can purchase dry rock in 10 to 25-pound boxes.
For a beginning reefer, we recommend dry rock. It’s inexpensive compared to the other rock choices, and you know you won’t be bringing in any unwanted hitchhikers or algae. Additionally, it is very porous and excellent for bacteria colonization.
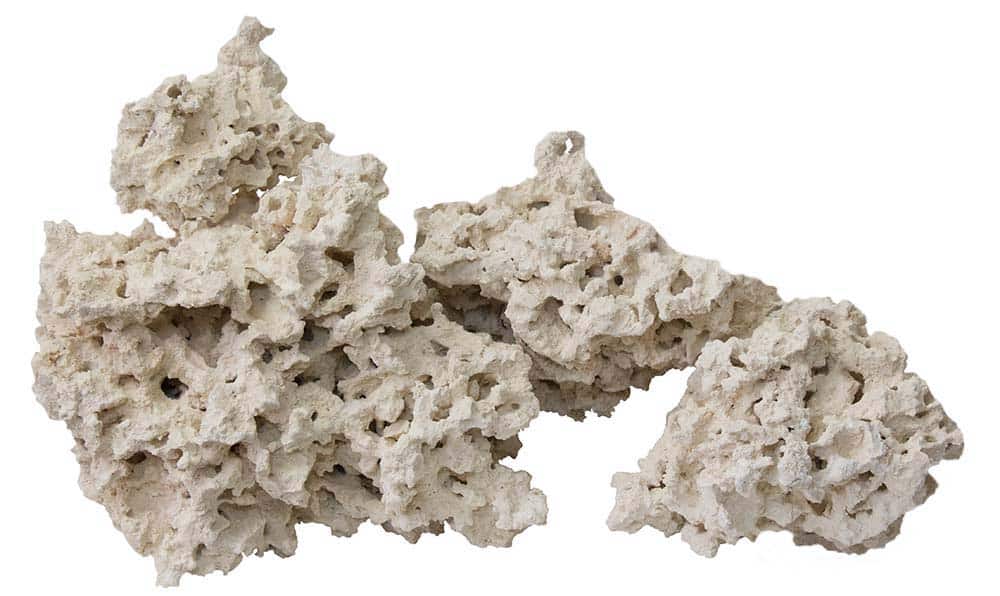
Regardless of the type of rock, you will want between 1 pound and 1-1/4 pound of rock for each gallon of water. So a 40-gallon tank needs approximately 40-50 pounds of rock. Four 10-pound boxes of dry rock will work perfectly for these tank options.
Place your rock into the tank first. You want the rock resting on the glass bottom to have a sturdy support base. The typical ‘rookie mistake’ is to stack the rock into a mound. You can try several arrangements until you find the aquascape you like the most.
The aquascape is the centerpiece of your reef tank and something you see every day. Remember, this is the environment for your fish and a base for your corals. Here are some tips for your aquascape.
- Don’t exceed 2/3 the tank’s height: You must leave room for coral growth.
- Create void space with peaks, overhangs, and cave-type structures: Many fish are shy, and almost all fish look for a place to feel safe during the day. If you aquascape correctly, these ‘hiding places’ will still be viewable.
- Once satisfied with your layout, affix rocks together at points they touch with super glue gel. The superglue gel is clear, which makes it easy to hide. Still, use it in locations where you won’t see it later.
The video below illustrates the dry rock in use and its benefits. I’ve included this video from 2014 because it demonstrates some aquascape mistakes. Watch for the three errors our buddy makes in the video.
You can see that this is not the most attractive aquascape. First, he is not installing the rock to the aquarium’s glass bottom to establish a sturdy base. Second, he essentially stacks the rock in a pile. Finally, the rock formation is too tall in the tank and won’t allow room for corals near the top of the formation to grow.
After placing your rock and completing your aquascape, it is time to put the live sand into your tank. Be sure to completely cover the bottom glass to a reasonably uniform thickness so there are no thick sand bed areas.
Step 4: Add saltwater and nitrifying bacteria
You can immediately add saltwater to the aquarium after your rock and sand are in place. Your primary saltwater options are:
- Mix your saltwater: I believe the majority of aquarists mix their saltwater. Mix reverse osmosis/deionized (RO/DI) water and your favorite salt mix in a large container. My favorite salt is Tropic Marine’s Pro-Reef. If you can get a large container like a Rubbermaid Brute trash can (with a lid), you can mix up enough to fill your tank in one shot. A 44-gallon Brute is under $50.00 and is widely used by reefers.
- Buy pre-mixed saltwater from your local fish store: Many local fish stores carry RO/DI and pre-mixed saltwater. When you buy pre-mixed saltwater from your LFS, they use their RO/DI and salt. As long as their RO/DI is ultra-low TDS (total dissolved solids near 0), there should be no problem. Pet stores like Petco and Pet Smart often sell saltwater in 5-10 gallon jugs – but I would avoid it unless it were an emergency.
- Use seawater: If you are lucky enough to live near a coastal area, you may be able to get natural ocean seawater from your local fish store. Assuming it is from offshore, it should be ok. Too close to shore, and I would be concerned about the potential for elevated pollutants. Quality varies by vendor, so your success might vary.
Warning! If you are buying pre-mixed or natural saltwater from your local fish store, please test it!
I once went a year using my LFS’s saltwater before testing it, and finding the phosphate level of the water was 8x my target level!
Nano Reef Adviser
An advantage to mixing salt water in a large container is that you will only have to make saltwater about five times a year. The Tropic Marine Pro-Reef salt uses pharmaceutical-grade materials and stores them for months. This will make your routine water changes easy.
Now that your tank is filled with live sand, rock, and saltwater, it’s time to add nitrifying bacteria. Specifically, you will want to add the nitrifying bacteria to the water with your first fish (Step 5). I use everyone’s goto bacteria, Dr. Tim’s Aquatics ‘One and Only’ live nitrifying bacteria.
There are so many good bacteria choices from Brightwell Aquatics. It’s live bacteria, so it will go to work immediately, protecting your fish and kicking off your tank’s nitrogen cycle.
Nitrogen Cycle: The most critical concept to understand when starting a new tank. Fish create ammonia through respiration, fish poop, etc. This ammonia can build up quickly and kill your fish. We avoid that by adding nitrifying bacteria to the water. We added live sand with dormant bacteria and Dr. Tim’s ‘One and Only’ with live bacteria. This bacteria will cling to your rock and sand.
Once you add your fish, it will immediately produce ammonia by breathing. Ammonia is also caused by decaying fish wastes and decaying fish food. Ammonia in the water is food for Nitrosomonas nitrifying bacteria. The bacteria will take the ammonia in and output Nitrite.
Nitrite is also a nasty thing to have in your tank. Don’t worry because Nitrobacter bacteria take in the Nitrite and output Nitrate. Aren’t you glad we add all these little helpers to keep our ecosystem working? Many of the corals you add later thrive on low Nitrate levels. ,
Important: Do not turn on your lights. Resist the urge to light your tank early. You will not want to light your tank until after the nitrogen cycle is complete.
Step 5: Add fish
How exciting, it’s time for fish! WAIT! I’m sure you’ve noticed that the saltwater in your tank is very cloudy. Would you want to swim in that?
While waiting for your tank water to clear up, let’s discuss what fish you should add. Select compatible fish that don’t have to share the same tank areas and provide a useful purpose when possible.
Remember that you only get to add one fish to your aquarium first. You want to stabilize the bacteria population for the amount of ammonia your first fish creates before adding another fish.
Your first fish has to be hardy AF. Let’s face it – you are a beginner and will inadvertently make decisions that risk this poor fish’s life daily.
Nano Reef Adviser
If you are even thinking about ‘Finding Nemo’ and how awesome it would be to have a Nemo and a Dory, I have some good and bad news. First, the good news: Nemo (Ocellaris clownfish) is the perfect first saltwater aquarium fish. They are hardy and generally peaceful with other fish. They also keep to limited areas of the tank, so they don’t interfere with other fish you want to add.
If you want more than one clownfish, add two simultaneously. Once a clownfish is established in a tank, it won’t accept another clown 90% of the time. Since it is recommended that you only start your tank with one fish, the two you get need to be very young. I started my recent tank with two baby brothers from my local fish store. I know they were brothers because all clownfish are born male.
The bad news is that Dory (Paracanthurus hepatus or royal blue tang) is a fish for experts only and tanks in the 120+ gallon range. Essentially they get diseases if you look at them wrong. Some issues with the Royal Blue Tang include lateral line disease, fin erosion, ich, and skin parasites.
You are supposed to wait about 30 days before you add any more fish. Do some research as to what fish you want to add. I recommend selecting fish that pull their own weight.
For example, I added a Yellow Coris Wrasse to my current tank. It is a beautiful yellow fish that helps stir up the sand bed (they will hide/sleep in the sand) and eat pests that can damage and irritate corals. I watch him nibbling at the sand and rocks all day, helping me maintain my tank.
Bioload hack: If you add your fish over time (think weeks and months,) you will be able to monitor your phosphate and nitrate and see how each new fish affects your testing results. If (that’s a big ‘IF’ not a little ‘if’) you have phosphate and nitrate readings near 0.00 – then you can add fish (one or two at a time) until your levels rise. A great LOW MAINTENANCE target for phosphate is about 0.03 ppm and nitrate between 3 and 10 ppm.
Nano Reef Adviser
A tank of fish mixed between those that live near the bottom, rest on or hide in and out of rocks, those that school, and/or those that hover will reduce fighting for territory and, therefore, stress the fish. The lack of stress will help reduce the potential for illness and disease that would otherwise not affect a healthy fish. Working to treat an entire tank of sick fish is not fun.
Important: Do not turn on your lights. Resist the urge to light your tank early. You will not want to light your tank until after the nitrogen cycle is complete and the tank is ready for coral.
I keep saying don’t turn on the lights because the fish don’t care. The only organism that wants light before you add your coral is algae. The last thing you want to do is start growing algae sooner than necessary.
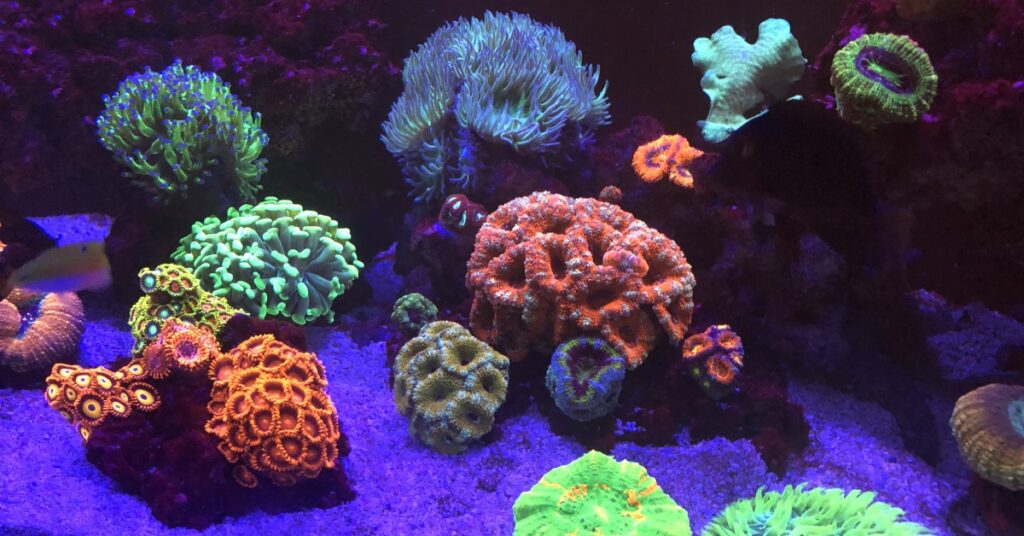
Step 6: Add invertebrates and coral
You will want to add invertebrates after the nitrogen cycle is complete. Start slow and build your clean-up crew. The goal is to have your clean-up crew eat algae early so it doesn’t build up. Once you can see it with your own eyes, the clean-up crew could have already been busy.
Read my complete guide on clean-up crew invertebrates titled Best Clean-up Crew for a Reef Tank for all the information you need to stock your reef tank properly.
My best recommendation for coral is to initially avoid SPS (small polyp stony) coral. Regardless of your skill level, your new reef tank will not support most SPS corals for a few months. Once you start to see the formation of coralline algae on your rocks, you will know the aquarium is ready.
Instead, start with soft corals and easy LPS (large polyp stony) corals. These coral types are beautiful and can create rhythmic movement in the flow. Euphyllia, Bubbles, Duncans, Leathers, Zoanthids, and Mushrooms provide various early choices.
Related Article: My Saltwater Corals Won’t Open Up.
If you aren’t lucky to have a great local fish store nearby, I recommend you shop at World Wide Corals.
Here is a short beginning coral guide to get you started.
One response to “Beginner Easy Quick Start Reef Tank Guide”
[…] out my article Easy Quick Start Reef Tank Guide to walk you through each step of a new tank […]